ROLE BASED AUTHORIZATION
Step1: Setup API.
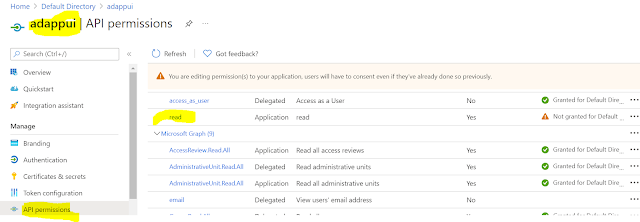
1. Create an app registration and create an app role. Make sure that the app role is assigned to user and applications.


Now we can have only users with this role access our application.

This app role behind the scenes adds an approles section to the manifest.json. We can directly add it to the manifest file also.
Step 2:
Setup an app registration for the UI/ WEB App.. We will grant this app the read role created in the API app (shown above). Go to Azure AD and select the UI app registration. When we register an application 2 elements get created.
1. App registration
2. Enterprise Application -- service principal that get created for the app
Adding roles to applications
Go to the App registration => API Persmissions => Add a Permission => My API's

The My Api's section will contain the scopes and roles that we have defined. Any roles that the application exposes will be available under the Application Permissions Tab

Once assigned we can view it inside the API Permissions tab.
Assign the Role to a User
We can also assign the role to a user. For that go to the enterprise application for the API.


To add roles to a group we need to upgrade the azure AD plan to premium.
API Code

Since we are using auth v2 token the client id must not have api:// .
services.AddControllers(options =>
{
//add an authorization policy to only allowed authorized requests
//and the access token must contain an email claim.
var policy = new AuthorizationPolicyBuilder()
.RequireAuthenticatedUser()
.RequireClaim("roles", "read")
.Build();
options.Filters.Add(new AuthorizeFilter(policy));
});
This will ensure that the api can only be access if an application/user has the read role in the token.
Configuring the Access token
To configure the access token to contain claims we need to go to the API app registration => Token Configuration.

Go to add optional claims and select the claims that we need to have in the token. Here we can choose which token should contain the claim ID or access.

Here I have asked the email and sid to be included in the access token
To add the groups claim to the token, click on add groups claim. This can be used to implement group based authorization. Ex: An endpoint can only be accessed by a set of users/ applications that are part of an azure ad group.

Using Manifest:
If you want to config your application to receive group claims, you need to set the "groupMembershipClaims" value as
SecurityGroupWe can specify the security groups to get a list of all the groups the user is part of. The token will contain an array that has all the GUIDS (group id's). We can specify that the access and expand the menu and even choose if we want the group names instead of Id's.
Then add a policyhandler that check for the groups .
https://github.com/Anish407/AzureAD-Role-based-Group-Based-Access-control/blob/master/WebApplication/Authorization/GroupsCheckRequirement.cs
Requesting a v2 token for the app

When we request for a scope, the access token that is returned depends on the configured access token version. If the value is set to null then we get a v1 token for the app. In this case we need to set the audience value in the appsettings file. For a v2 token the configuration doesnt require an audience claim.
References:
1. https://jan-v.nl/post/2020/my-bearer-token-is-sts-windows-net-but-i-need-it-to-be-login-microsoftonline-com/
2. https://damienbod.com/2021/03/01/using-azure-ad-groups-authorization-in-asp-net-core-for-an-azure-blob-storage/
Comments
Post a Comment